
In 2017, CrashPlan was one of the most popular full-computer offsite/cloud backup tools for consumers. It had millions of paid users, usually paying around $10/month for a few terabytes of offsite storage.
But then… “On August 22, 2017, Code42 announced they were shutting down CrashPlan for Home, effective in October 2018. They were not accepting new subscriptions but would maintain existing subscriptions until the end of their existing subscription period, at which point the backups would be purged.”
Picking a backup tool is hard. If you outsource your backups to a commercial entity, you have to be convinced that entity will stand the test of time — and won’t undergo dramatic business model shifts — since, after all, your backup scheme is supposed to follow you around for life.
This is an ideal software category in which to choose open source software — plus a highly durable, interoperable, and financially-well-supported cloud storage option.
Thankfully, as of 2018 or so, I have this open source software + interoperable cloud storage solution working on my main Linux development machine. I’ve been using it for 5+ years and since I’m very happy with it, I’d like to share it with you all here.
The restic logo sets the tone for how you should think about backups!
As a hacker (that is, as a playful programmer), you inevitably have important files on your desktop that don’t get automatically backed up some other way. Yes, you probably have your source repos backed up in GitHub or Gitlab, and you probably have your phone backed up in Apple iCloud or Google One. Maybe you are even organized enough to have digital copies of your personal records, usually in DOCX or PDF format, in Dropbox or Google Drive, assuming you trust the data privacy policies of these providers.
But you still have millions of other files on your desktop computers that include: artifacts not checked into source control (or not yet pushed to remote); operating system and application configuration; photographs and videos from your non-phone camera gear; screencasts and Zoom/GMeet video recordings; paranoia-driven backups of data exfiltrated from cloud providers like Gmail and Google Drive; and so on. Perhaps you even have sensitive/important medical or tax/financial records that you’ve been nervous to stick in a cloud data store.
This post will cover a setup that works well in practice, while also having some interesting technical properties worth discussing.
Though I primarily run Linux, I don’t only run Linux. Specifically, I have a Mac Mini that I use for access to Adobe software (Photoshop, Acrobat), Microsoft software (Office), as well as a handful of proprietary macOS-only apps (e.g. Screenflow, MacWhisper). I also used to run Windows 10 as a media PC — I’m a film lover with a small collection of old classic films and audio commentaries. (This media PC was also the last remaining device in my world with an optical disk drive, now a hardware relic!) I’ve been winding down that usage of Windows 10 just to reduce the number of OSes in my life, but I still had to keep it backed up while it was running.
As a result, I’ve had to set up a solid backup workflow across every major desktop operating system. Obviously, solid open source software is harder to come by on macOS and Windows; as a result, for those platforms, I’ll discuss an “indie” software tool which has some open source components.
I’ll cover Linux backup workflows at the end, but, to start off, I’ll describe what I do on macOS and Windows, because I think it’ll be easy to understand before we introduce the Linux tooling that is 100% open source.
Here’s a preview of what’s in this post. These links jump ahead in case you want to skip the macOS and Windows sections.
- macOS backups for hackers (Time Machine + Arq + Backblaze B2)
- Windows backups for hackers (Arq + Arq + Backblaze B2)
- Linux backups for hackers (
restic+rclone+ Backblaze B2) - Examples of
resticusage - Using
rcloneto getresticrepos offsite - Conclusion
macOS backups for hackers
If you use macOS and want to keep all your files backed up, I can give you a simple recommendation. Get a nice USB3 SSD, like the Samsung T7 or Samsung T7 Shield. I particularly like the latter drives with the rubber “shield” if you ever have to travel with them. They grip to more surfaces and feel safer when thrown in a gadget bag.
Pick your Samsung (or equivalent) USB drive storage size using the formula of 2x your local disk — if your MacBook or Mac Mini has 1TB of SSD storage, get a 2TB USB3 SSD. If you have 2TB of built-in storage, get a 4TB drive.
If you have more than 2TB of built-in storage, and you plan to actually use it for backup-worthy files, you are a bit of a packrat and may need an NAS instead of a USB3 drive. You could buy a larger mechanical disk drive, but this will be bigger, noisier, heavier, less portable. I like to keep everything in SSDs now that the price points are affordable. On macOS, a trick you can use is to buy a couple of SSD drives and play around with concatenated disk sets (JBOD).
Use Apple Time Machine to create a local backup of your disk onto the external storage via USB, and leave it connected all the time. The above Samsung drives are silent and have discrete indicator lights in the back of the drive near where the cable comes out. Just in case you’re sensitive to superfluous office sounds and lights, like I am. This is a solid setup.
Note also that you can format the drive with an APFS container with two partitions — a Time Machine partition and a Spillover partition. The way APFS works, the Time Machine partition will automatically grow to use all available space, while the Spillover partition just provides a “scratch” area with any remaining space. This is a nice special feature of APFS and you may as well take advantage of it.
Next: set up a paid account with Backblaze B2. You’ll need a credit card here, and to set up 2FA security. At the time of this writing, their pricing is $6 per terabyte of cloud storage per month, you can see their pricing page for the latest details on that. But it’s where you will store your files off-site in the cloud, and it plugs in to the next tool.
Next: Pay for Arq 7. At the time of writing, this about $50 per computer, but a 5-computer “family pack” is available for about $80. You can also support the developer with a $25/year support plan.
I said “Arq 7” intentionally: Arq 7 is the version where you bring your own cloud storage, not Arq Premium, which bundles its own cloud storage. Plug in Backblaze B2 API key and secret into Arq 7. Now you have offsite cloud backups, too.
At that point, between Time Machine and Arq (with the Backblaze B2 backend), you have a 3-2-1 backup scheme fully operational.
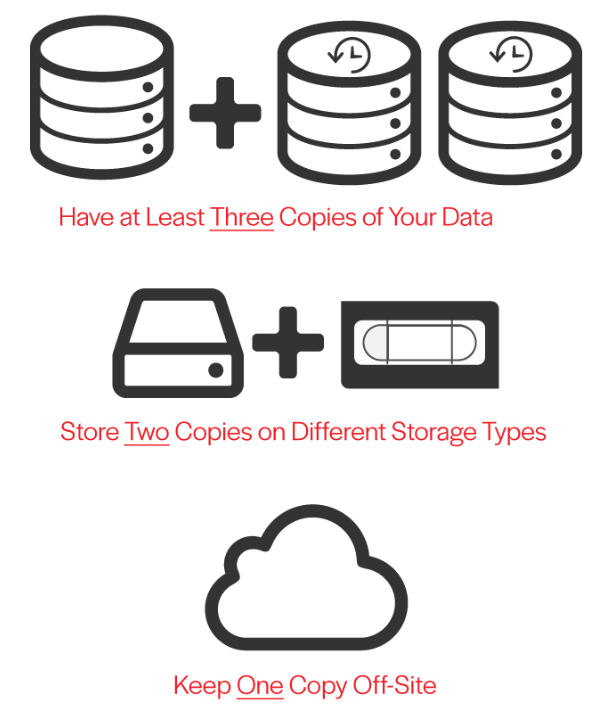
Namely, you now have 3 copies of your files: the original, a copy locally on the USB3 drive via Time Machine (including a full version history); a copy offsite via Arq (including a full version history), stored in a Backblaze B2 bucket folder. Your on-site backups are encrypted, your off-site backups are encrypted. Your backup procedure is 100% incremental, and low on day-to-day resource usage. Your bytes are protected. Huzzah!
Windows backups for hackers
You can replicate this setup on Windows, minus Time Machine. The trick for Windows is to pay for Arq 7, once again, but set up two storage locations: the local USB3 SSD as an “external drive”, and the Backblaze B2 bucket folder as the “offsite location.”
Essentially, Arq’s style of backup is similar to Time Machine, anyway. It’s snapshot-based and deduplicated. But on macOS, due to the convenience of Time Machine’s integration with the OS, you are better off using Time Machine directly. Especially since Time Machine makes Apple hardware transitions on macOS especially easily e.g. moving from an old Intel Mac Mini to a newer Mac Mini M1/M2, you can do this by pointing the machine at a recent Time Machine backup of the old machine on your external USB3 drive.
One important thing about Arq is that it taps into the right operating system technology to ensure its backup procedure is sound. Specifically: “By default Arq creates an APFS snapshot (on macOS) or a VSS snapshot (on Windows) and uses that snapshot as the source for creating a backup record. The advantage is that Arq is backing up your files as of a point in time, instead of backing up files that are changing.” This is important because sometimes when you run a backup, the state of your filesystem is changing, and naive backup implementations can stick inconsistent filesystem state in your backup repository, because the filesystem will have changed between when the backup started and when it finished. APFS and VSS snapshots address this.
Is Arq open enough?
The short answer is no. It’s not F/OSS. And only small bits of it are open source.
If you’re a Linux user, you’ll soon bask in the warm glow of the 100% free and open source restic implementation. But Arq is probably “good enough” for your proprietary OS machines. Especially if they play secondary roles in your hacker life vs your Linux machines. Arq is an indie app developed for Windows and macOS. It started its life on macOS, where it is a popular offsite backup product. You can read Stefan’s story here.
How about Backblaze? Well, short of running your own data center somewhere, it’s pretty much impossible to make your offsite backup system open source. Perhaps the closest is rsync.net, which does deserve an honorable mention for its hacker ethos.
But, for my offsite backup, I care more that the company will stand the test of time, and that it is, at least, interoperable. Backblaze is a publicly-traded company (NASDAQ symbol: BLZE; IPO happened in Nov 2021) with a multi-decade history, 100% focused on off-site cloud backup. They’ve been running Backblaze B2 atop their massive disk storage data centers as a cheap alternative to Amazon S3 for almost 10 years. It’s a rock-solid service. Their blog also has some great write-ups of their “Storage Pod” design.
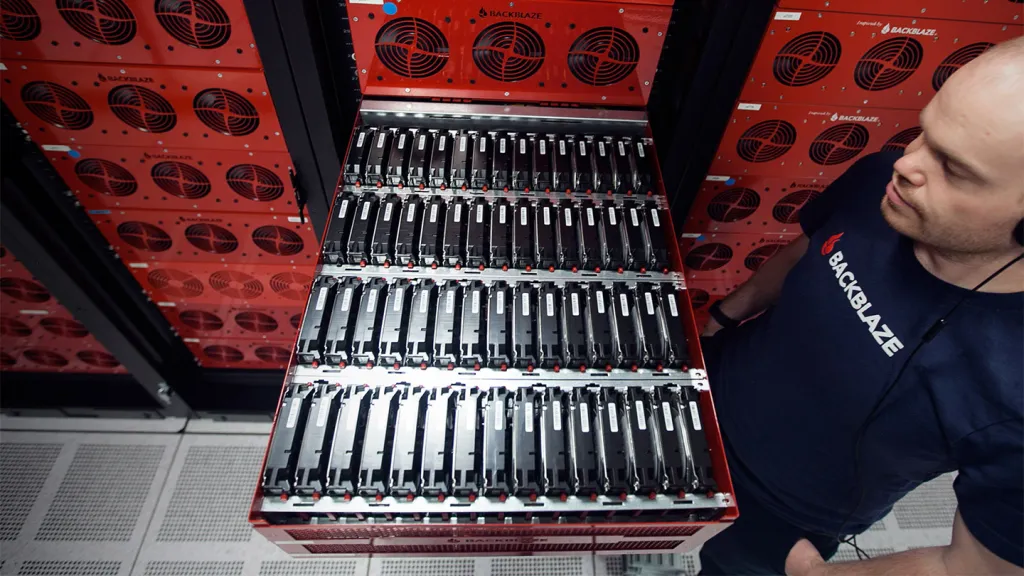
Photograph inside a Backblaze data center, showing their “Storage Pod” design for big RAIDs of spinning rust. They deal with the heat and noise so you don’t have to do so yourself!
Though Backblaze isn’t open source, B2 is Amazon S3-compatible. That means it plugs in to a ton of open source tooling automatically, such as AWS boto and the AWS S3 CLI. What’s more, the popular rclone UNIX utility has a very performant, stable, and optimized implementation of Backblaze B2 as a backend. Backblaze themselves also provide the b2 CLI, implemented in Python, which can access your cloud files.
Though Arq isn’t open source, the developer has made an effort to document the Arq 7 backup data format. What’s more, they have made an effort to make available a macOS command-line tool for restoring backups in this Arq format, called arq_restore, which you can find on GitHub here. This is all to say: the developer has made the decision to make the “polished experience” of Arq a proprietary and paid experience, so that he can build a lifestyle business around it. But he has made a strong effort to make sure you have a way to recover your data should the company go under, especially with just a little effort from the open source community of users.
Arq’s design advantages
What’s so good about Arq anyway? You can check out Arq’s features page, but I’ll summarize my favorites:
- snapshot-based point-in-time backups
- automatic chunk-based deduplication
- automatic
LZ4compression - chunk-based deduplication used as basis for efficient incremental backups
- repository data format is designed to be upload-friendly to remote cloud locations (not too many files and folders)
- backup repositories are encrypted at rest, only unlockable with a master password
- backup process can be tuned to use fewer resources (fewer CPUs, less upload bandwidth)
- can restore single files, folders, or whole backups
Let’s now move to Linux.
Linux backups for hackers
Though Arq doesn’t exist on Linux, many open source alternatives abound. I have used many over the years, including rsync, rclone, rdiff-backup, and borg. But, the one that really captured my heart a few years back, and that will be my go-to for as long as it is available, is restic.
Basically, restic has all the features Arq has. But unlike Arq, because it’s targeted at Linux users, it’s used entirely from the command line. And since it’s open source to the core, you can understand exactly how it all works.
The key features of restic
- open source and written in Go (BSD 2-Clause “Simplified” License)
- since it uses Go, a single pinned/versioned
resticbinary can always be backed up along with your backup repository - innovative content-defined chunking algorithm, which is also abstracted into its own simple Go library
- extensive documentation and manual via ReadTheDocs
- solid community via Discourse forum
- snapshot-based point-in-time backups using
restic backup - automatic chunk-based deduplication (built-in to file format via CDC algorithm above)
- automatic
zstdcompression (controllable per-run, can be turned off for already-compressed files, like JPGs) - chunk-based deduplication used as basis for efficient incremental backups
- repository data format is designed to be upload-friendly to remote cloud locations (not too many files and folders)
- backup repositories are encrypted at rest, only unlockable with a master password
- backup process can be tuned to use fewer resources (fewer CPUs, less upload bandwidth)
- written in a highly parallel fashion to take advantage of all of your local CPU cores efficiently, if you just want a full backup to happen quickly
- many command-line flags for including/excluding file systems, handling edge cases of different mounted filesystems (such as how to deal with inodes), and so on
- can restore single files, folders, or whole backups
- can use
restic mountto create a FUSE mount point of your backup repository, which then allows you to access the full backup filesystem for any point-in-time snapshot, direct in your file manager or shell
Though restic also has a number of cloud backends built-in, including one for Backblaze B2, I don’t personally use those. I use restic only to create the equivalent of “Time Machine” repositories on my Linux machine(s). That is, a USB3 SSD that has a restic repo with regularly-run snapshot backups of my main machine.
Since we’re talking about Linux and hackers, you might wonder whether one’s filesystem choice has an impact on one’s backup methodology. I personally run ext4 everywhere in my Linux environment: on my desktop developer machine, on my backup drives, and so on. It’s rock solid and simple. But, a lot of folks experiment these days with zfs and btrfs, two filesystems that have snapshotting features built-in. I use these filesystems too, but only on servers, never on my own personal machine.
If you do use zfs or btrfs on your desktop machine, my main piece of advice is to just use ext4 for your backup drives that store your restic repo. I personally think of restic as almost being like “zfs-style snapshot backups in userspace, for any arbitrary filesystem(s).” Since restic has its own concept of chunk-based deduplication and snapshotting in its repo format, may as well keep its underlying filesystem simple and ensure every byte of your backup drive is used actually storing your efficiently-packed restic repository data.
Also, you might think btrfs and zfs snapshots would let you create a snapshot of your filesystem and then backup that rather than your current live filesystem state. That’s a good idea, but it’s still an open issue on restic for something like this to be built-in. There’s a proposal about how you could script it with ZFS in this nice article on the snapshotting problem for backups.
For now, the best idea is to run your restic backups during a time when your computer isn’t actively used, and to shut down background tasks when running your backup. If you are paranoid about inconsistent filesystem state for desktop applications, you could even shut down your entire X11 or Wayland server when running the backup, to ensure no desktop programs are writing files while your backup is running.
Using rclone to get restic repos offsite
The restic repository format ensures that every time you run restic backup, it’ll only store new data incrementally into your repository, which speeds up repeated backups dramatically.
To get the third copy of my files off-site to the cloud (to Backblaze B2), I simply use rclone sync to copy the entire restic repository up to a Backblaze B2 bucket folder.
When rclone sync is used against a restic repo source and a Backblaze B2 bucket destination, the rclone uploads are also efficiently incremental. It’ll do a rather speedy scan of the local restic repo, do a remote listing of the files in the Backblaze B2 repository, and only upload the new “chunks.” Thus, if a restic backup added, say, 15GB of new data to your backup repository, you’ll see rclone sync doing only 15GB worth of chunk uploading on its next run.
My reasoning for splitting these two processes — restic backup and rclone sync — is that I run the local restic backup procedure more frequently than my offsite rclone sync cloud upload. So I’m OK with them being separate processes, and, what’s more, rclone offers a different set of handy options for either optimizing (or intentionally throttling) the cloud-based uploads to Backblaze B2.
So, all together now. Similarly to macOS, for Linux, I have a 3-2-1 backup scheme where I have the local copy of my files on an ext4 filesystem in my internal drive, an extra copy in a local restic repo on an ext4 filesystem living on an external USB3 SSD, and then a final extra copy by virtue of rclone shipping that repo to a Backblaze B2 bucket folder.
All with 100% incremental backups, encryption, compression, deduplication, snapshots built into the open source core, thanks mainly to restic.
Edge case: photography backups
I have one more Linux backup workflow, as well. This centers around my Canon 5D3 and R7 photography hardware, and the resulting JPG/CR2/CR3, as well as MP4/MOV files.
For these, I dump all the SD card and CompactFlash media from the cameras into a 2TB USB3 SSD. I then create a restic repo on a 4TB USB3 SSD just for the deduplicated snapshots of these photos/videos. And then I use rclone to copy that repo up to a separate Backblaze B2 backup folder, just for the photos/videos again. Since I know this backup only contains photos/videos produced by Canon hardware, I know that everything is already maximally compressed.
As a result, I flip off compression on this restic repo, since that wastes a lot of CPU cycles for close to no storage savings.
This is yet another reason I am happy to have split up restic local backups from rclone offsite backups. Because, when I’m traveling on photography trips with limited internet, I bring my laptop and 2x photo SSDs along, but I don’t necessarily have high-speed uplinks available for offsite backups. So I’ll do a photo/video dump onto one SSD, a restic backup onto the second SSD, and then I’ll just “do my best” to get that second SSD’s restic repo shipped to Backblaze B2 via rclone — but, maybe I won’t get to that until I’m fully home from travel, with faster internet access again.
In this “while traveling” edge case, my 3-2-1 setup degrades into a 3-3-0, that is, 3 copies of the data, 3 of them local, 0 offsite (the original SD/CF flash media serves as one copy, the SSD drive for photo/video dumps serves as another, and the restic SSD drive for the unified photo/video backup repository serves as a third). It then switches back to 3-2-1 when I get home, where I upload the restic repo with rclone, and then I clean up the SD/CF flash media, to prep it for the next trip.
Also, for strange reasons related to device compatibility, my photos/videos end up stored on FAT32-formatted drives. FAT32 is an ancient filesystem with major limitations, such as 2TB drives and 8.3 filenames. But its main benefit is that it works nearly everywhere. Inside my Canon cameras, old and new. Old versions of Windows, old versions of macOS, every version of Linux, Android, and iOS. Some day soon, exFAT will replace it, but there are still some small corners of the computing world where exFAT isn’t supported. For example, exFAT only came to Android devices in 2022, mainly due to patent issues.
For backing up FAT32, I turn off restic’s inode-based file scanning approach, since FAT32 doesn’t have the concept of an inode. But it works wonderfully and speedily anyway, even against FAT32.
Note: though the source filesystem is FAT32 in this case, I always use ext4 as the filesystem on which the restic repo is stored. Remember: restic doesn’t store files, only binary chunks, indices, and metadata, from which a filesystem “view” is recreated on-demand, via snapshots, restores, and mounts. So you want to use a more reliable filesystem, like ext4, to store the restic repo itself.
Examples of restic usage
In one shell session, to make a repo and make a backup.
❯ tree home home ├── Documents ├── Downloads └── Pictures ❯ mkdir restic-repo ❯ ls home restic-repo ❯ restic init --repo restic-repo created restic repository 516b735669 at restic-repo Please note that knowledge of your password is required to access the repository. Losing your password means that your data is irrecoverably lost. ❯ restic backup home --repo restic-repo repository 516b7356 opened (version 2, compression level auto) no parent snapshot found, will read all files Files: 0 new, 0 changed, 0 unmodified Dirs: 4 new, 0 changed, 0 unmodified Added to the repository: 1.452 KiB (755 B stored) processed 0 files, 0 B in 0:00 snapshot ea45dc65 saved |
Then, inspect the backup’s state:
❯ restic snapshots --repo restic-repo repository 516b7356 opened (version 2, compression level auto) ID Time Paths ---------------------------------------------------- ea45dc65 2024-06-19 10:43:47 /home/am/example/home ---------------------------------------------------- 1 snapshots |
Then, create a FUSE mount of the backup repo:
❯ mkdir restic-mount ❯ restic mount restic-mount --repo restic-repo repository 516b7356 opened (version 2, compression level auto) Now serving the repository at restic-mount Use another terminal to browse the contents of this folder. When finished, quit with Ctrl-c or umount the mountpoint. |
Finally, with the mount point being served from one terminal, inspect it from another terminal with ls:
❯ ls restic-mount hosts ids snapshots tags ❯ ls restic-mount/snapshots/latest home ❯ ls restic-mount/snapshots/latest/home Documents Downloads Pictures ❯ ls restic-mount/snapshots/ 2024-06-19T10:43:47-04:00 latest ❯ ls restic-mount/ids ea45dc65 |
You can then kill the restic mount proces. Then, to upload that repo offsite, with an rclone remote called b2 (for Backblaze B2) configured, it’s as simple as:
rclone sync restic-repo b2:restic-repo |
Conclusion
Arq 7 is good software, on macOS and Windows, for backups. But it’s paid and proprietary. The indie dev behind it has made a strong effort to open up as much of it as he could while maintaining his business model.
Backblaze B2 is a great SaaS for off-site data storage. It’s cheaper than Amazon S3, but compatible with Amazon S3. It’s plugged in to a lot of UNIX backup tools already, like rclone.
restic is an absolutely magical piece of open source Linux software written in Go. It’s free as in free beer, and free as in freedom.
It’s rock-solid and has all the features you need to get your backup workflow handled. I think of it as “ZFS implemented in userspace.” You get repos, snapshots, tags, chunk-based deduplication. You get tuneable compression, performance, pruning, as well. What’s not to love?
Hackers don’t need to live in fear of losing their data. These open (restic, rclone), or nearly-open (Arq), tools can help. Interoperability is also important in your backup approach, which his why Backblaze B2 is a good approach for your offsite backup, it being interoperable with S3 protocols/tools/APIs. Scriptability is of the ultimate importance for backups, and restic + rclone + Backblaze B2 give you the ultimate in scriptability.
Paranoia is also important in backups. “Hope is not a strategy.” These tools all have the right amount of paranoia built right in.
Though setting up a backup workflow you stick to is important to recovering from a disaster scenario, another important thing to remember is to test your backup restores. Human error, forgotten keys, and bitrot can just as much ruin a backup strategy as forgetfulness or a poor tooling architecture can.
Do your backups every day and week, but do a backup restore check at least once a year, on March 31, which is World Backup Day. My approach is to restore a single random file from a single random snapshot from the last few months. And to do this from a clean boot of Ubuntu 20.04 / 24.04 LTS, off a USB jump drive “startup disk,” downloading the tools I need, like restic, right then and there from the clean Linux environment.
But you can be even more paranoid than that by, say, restoring a full backup to a formatted old computer or formatted old disk drive.
May your bytes be forever recoverable!
restic. Some areas I could go in a future article are:
- How restic pruning works
- How restic locking works
- Running restic as a dedicated
resticuser - My
iresticset of shell scripts around restic - how zstd compression works
- restic encryption and decryption
- restic snapshot and tag use cases
- restic restore approaches
- Using
restic find - Using
restic lswith tools likefzf - bonus: cron, runitor, and healthchecks.io